Tuesday, May 15, 2012

Boho-Chic Style

I like talking about style so much, not only about fashion, but also room decorate and so on.
One of them is Bohemian style that got hippie influence called Boho-Chic :D
Boho-chic is a style of fashion drawing on various bohemian and hippie style..check this one out


It has been seen since the early nineties and has repeatedly re-surfaced in varying guises. Many elements of boho-chic became popular in the late 1960s.


I also love this boho-chic style for room decorate :D


or the brighter color scheme like this


it will be great if I could have these decoration for my tiny room
I love Boho-chic so much (^,^)

Beautify Your Notebook Looks :)

Feel so bored with your laptop case?? why not tryin to order a different one from Idea Felt to beautify your notebook outlook with new and unique notebook soft case like picture below :)

We can also decorate soft cases you ordered with your lovely cartoon picture on it :D 

Wanna buy for a piece or more, just drop me an email at ideafelt@yahoo.com or felt.idea@gmail.com
or to get more info about any item in this blog please feel free to sms to +6285648063111 
-dee's Idea-

Hwaiting!! \(^o^)/

I really had fun and learned a lot of stuffs from my classmate in high school. She likes K-POP fashion so much, so i tried to made her some headbands from wool felt..and she likes it and asks me to make more.
now she can make every K-POP festival more exciting \(^o^)/
Just drop me an email at ideafelt@yahoo.com if you would like to buy some pieces :)

Wanna buy for a piece or more, just drop me an email at ideafelt@yahoo.com or felt.idea@gmail.com
or to get more info about any item in this blog please feel free to sms to +6285648063111

Friday, May 4, 2012

Necklaces For You Girls :D

I've made Party Necklaces for you to choose.... to beautify your looks. be different, girl! ;)

Let me know which one you'd prefer.. :)


N1: Circle, N2: Geometric, N3: Floral, N4: Tropical, N5: Flowery, N6: Bow, N7: Leaves
Wanna buy for a piece or more, just drop me an email at ideafelt@yahoo.com
or to get more info about any item in this blog please feel free to sms to +6285648063111

Monday, March 12, 2012

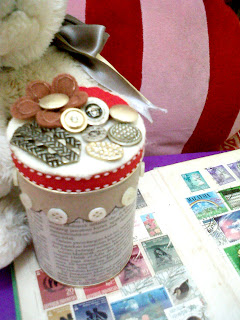
Vintage Brooches Storage

You may think that paperclips, safety pins, and brooches are little things that difficult to put in order. They spill and disarray. Making little storage will keep them saved. Here is a storage box that can help you save your little stuffs.

Material needed
1. An old can
2. Unused newspaper or magazine
3. Brown paper
4. Pretty Ribbons
5. Wool felt
6. Many kind of old and gold buttons
7. Few inches of cooper wire (or you can get them inside unused cable)
Tools
1. Scissor
2. Glue gun
3. Needle
How to make
Step 1:
Wrap and glue the can’s surface with old newspaper like picture above.

Step 2:
Make the paper laces. Cut the brown paper to make a paper lace like picture below

Step 3:
Wrap and glue the brown paper on the top of paper wrapped can, so it looks like the picture below, then decorate it with buttons


Step 4:
Glue the ribbon around the side of can cover. Then add felt on the top of the can cover accordingly so it covers up the can cover.

Step 5:
Use the wire to be stiched trhough the fabric that already shaped before (for making flower petals) like the picture below, so that the petals can be bended.

Step 6:
Decorate the can cover with many kind of old and gold buttons that arouse a vintage looks of this old can.

Friday, January 6, 2012

Starting

We can starting felt-crafting by prepare some basic materials. Let’s begin with something simple. We will make a simple pouch like this. It can be used as handphone or i-pod pocket:


We just need:
Felt
Fabric
a needle
some threads according to the felt color
a scissor

Step 1: cut the pattern both felt and fabric


Step 2: making inner pouch
Sew two pieces of fabric sheet that already shaped before, sew three sides of those. Make it like a simple pouch. You can also using sew machine.


Step 3: sewing the pouch
Sew all the patterned felt as shown above by using blanket stitch.
Step 4: sewing both inner and felt pouch
For finishing, slip the basic fabric within felt poch then sew each edge of both pouch that didn’t stitched yet.
 -liefDee-

Monday, January 2, 2012

Stitching

Wool felt is easy to stitch and sew because its edges don’t fray and the fabric is pliable. Embroidery needles have large eyes and available in several sizes. There are few basic embroidery stitches that can make your felt projects more fun and flair.

Backstitch

Backstitch which is the basic stitch can be used to make a straight or curve line on the fabric or to sew two fabrics together.

Poke the needle up through the fabric where the first stitch will end. Pull the thread through. Poke the needle down through the fabric to the left to complete the first stitch, then up through the fabric to the left an even distance away, and continue along the stitching line.

Running Stitch

Running stitch is also the basic stitch used to sew two fabrics together and create a line. Poke the needle in and out of the fabric at a regular intervals.

Blanket Stitch

This stitch will bind off the raw edge of wool felt or attach another felt shape to a base fabric. The stitch begin with the thread at the edge of fabric. Poke needle down through the fabric about ¼ inches from the edge and ¼ inches to the right of thread then up at the edge straight up from the needle. Keep the needle over the thread.

Daisy Stitch

Poke the needle up through the fabric at the base of the petal. Poke the needle down through the fabric next to the thread at the base of petal, then pull the thread to close the loop to the correct size. Poke the needle up through the fabric at the end of petal where the stitch will secure the thread. Poke the needle down through the fabric on the other side of looped thread then pull it snug. Poke the needle up for the next petals.

French Knot

Poke the needle up through the fabric where the knot will be. Wrap the thread around the needle about 2-6 times depending on how large you want the knot. Then poke the needle straight down next to where the thread came up and pull the wrapped threads snug against the needle while pushing needle through the fabric that leaving the knot on the surface.


-LiefDee-